Interhome Owner Portal
User Guide
Note on translation
This guide was originally written in English. If you read it in another language, it might contain machine translation inaccuracies.
The specific FAQs about the migration to the owner portal for atraveo landlords can be found here https://www.atraveo.com/faq
1. Login
Note on account creation
An Owner Portal account is created for you when becoming an Interhome partner. It's not possible to sign up manually. If you're not an Interhome partner yet, but you want to be, please get in touch with us: https://www.interhome.group/en-gb/myhome
1.1 First login/password reset
First login
If you have never logged into the Owner Portal before, you need to set a password first.
- Go to https://new.myhome.interhome.group/forgot-password
- Enter your Owner number as per your contract. If you don’t have it, please reach out to your Interhome representative.
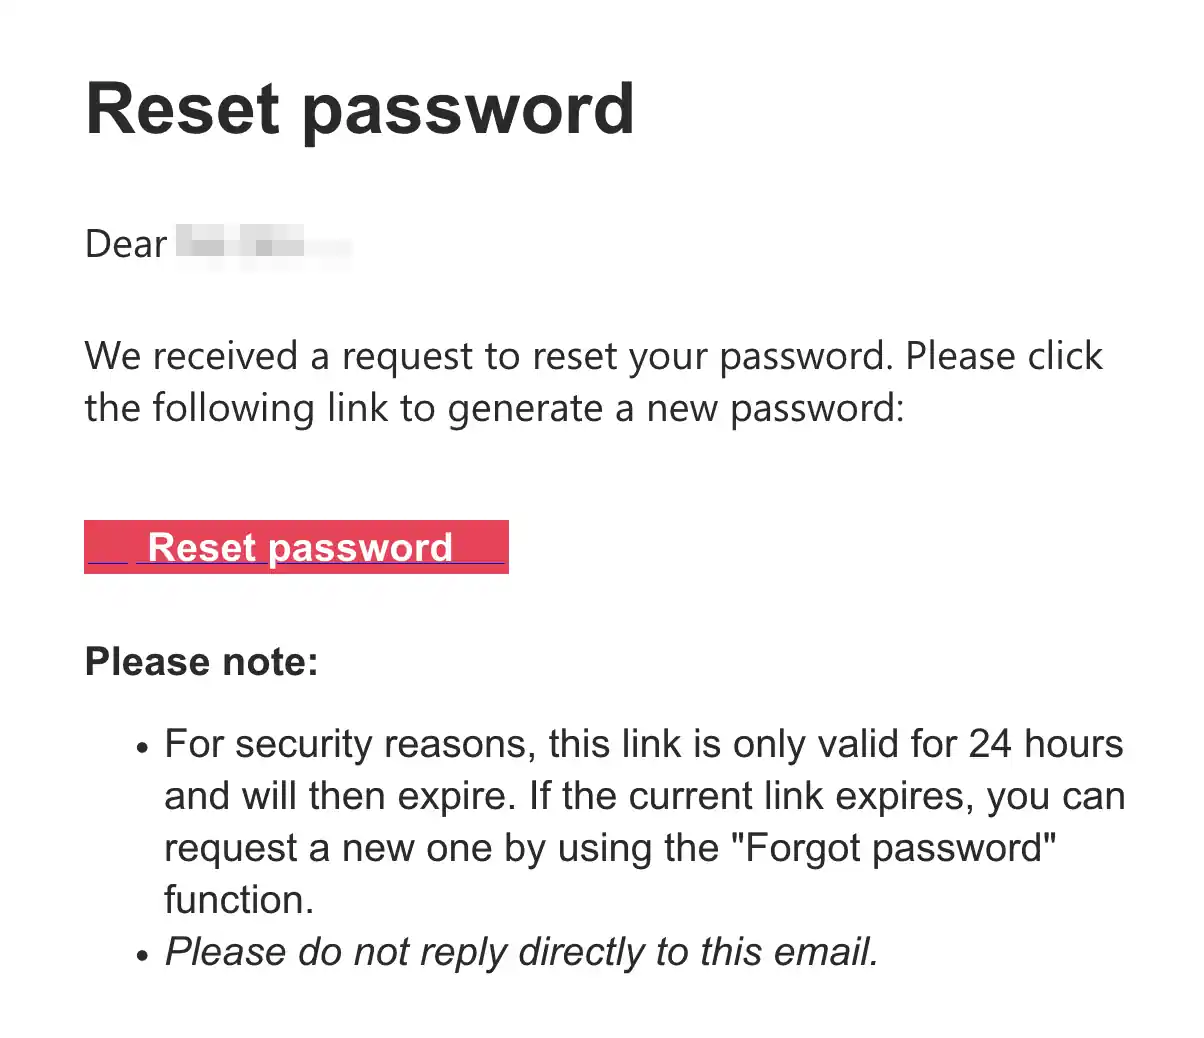
- Click Request a 'set password' email
- You will receive an e-mail with a Request a 'set password' email button
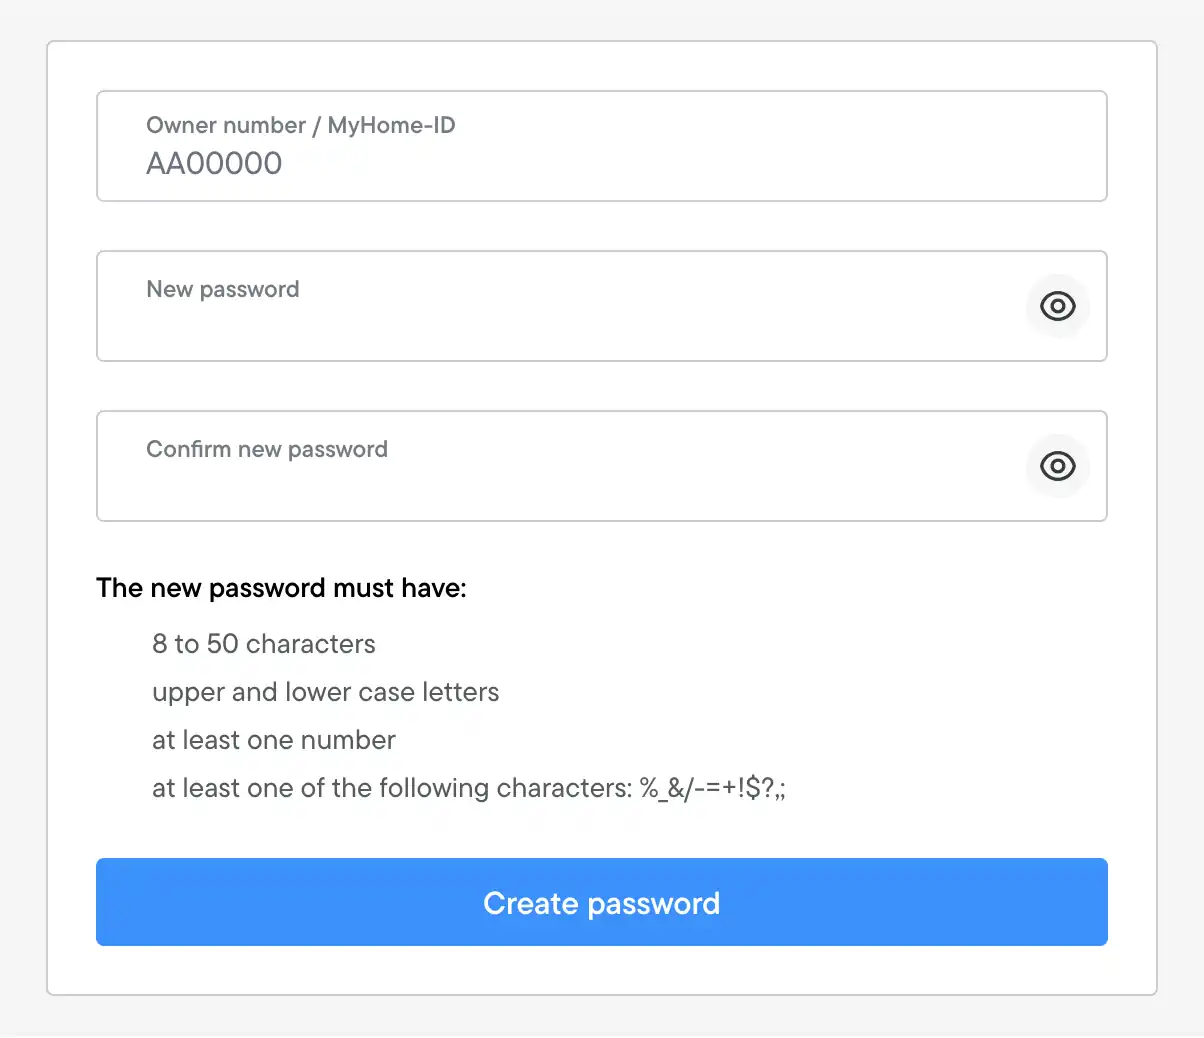
- Next, you’ll see the form where you can create a new password:
- After successfully creating your password, follow 1.2 Login with password
1.2 Login with password
- Go to https://new.myhome.interhome.group/login
- Enter your Owner number and password. If you don’t have these, please reach out to your Interhome representative.
- Click Login
- If a verification code is required, see the next chapter.
If all login attempts fail, please contact your Interhome representative through email or phone.
1.3 Verification codes
For security reasons we often ask for a verification code. This code is typically sent to your email address.
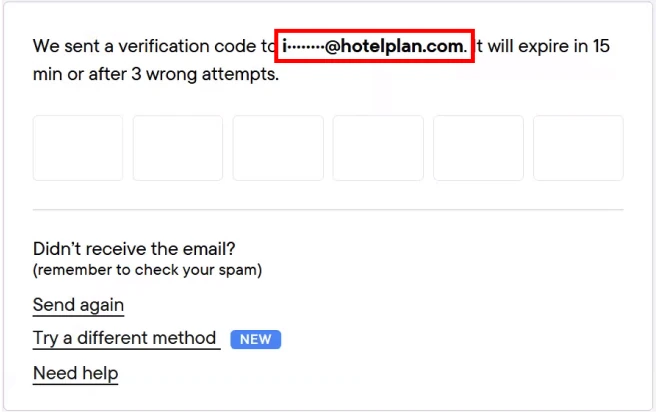
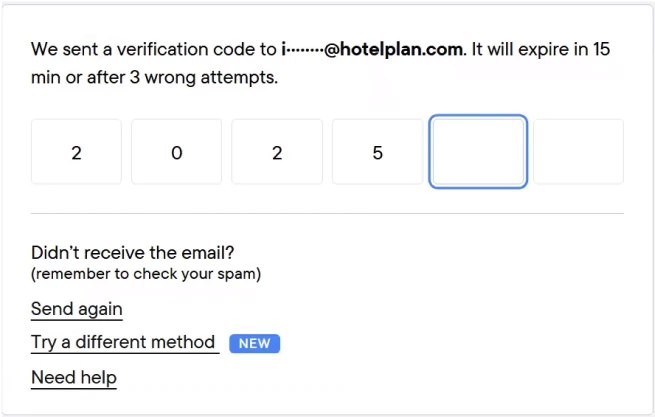
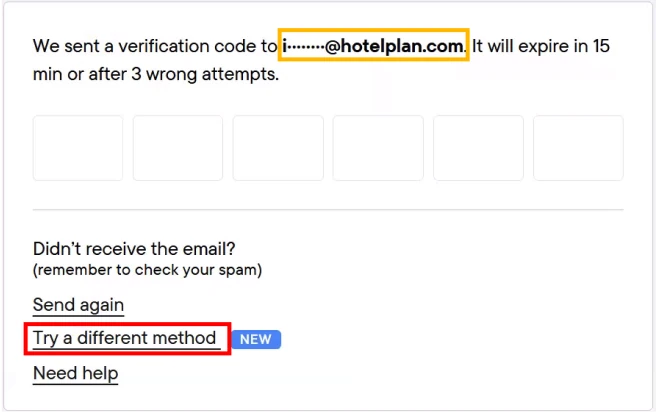
- The following dialog asks for a verification code. Please open the email account mentioned in the dialog.
Note on verification email delays
To certain email providers, verification emails arrive with a significant delay. We are working on solving this issue. If you have an email address with another provider, you can add a secondary email address for receiving verification codes - please see the next chapter for more info.
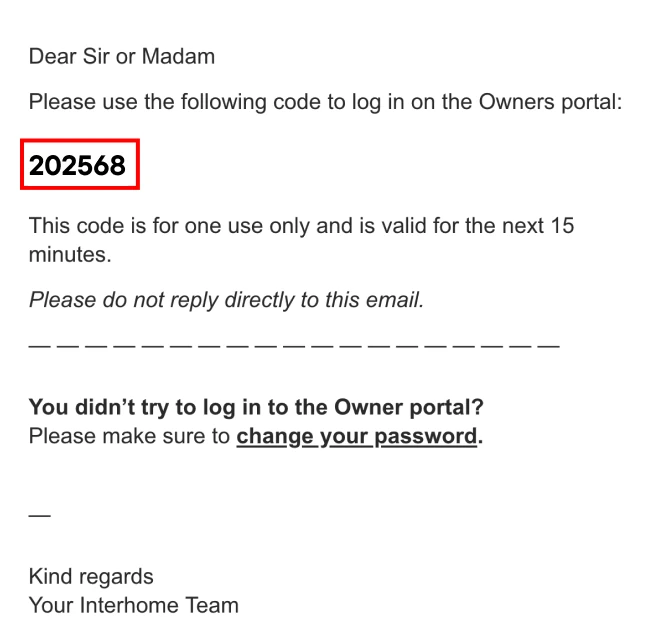
- From the received email, copy the 6-digit code:
- Paste or type in the code into the form
1.4. Secondary email addresses for verification codes
1.4.1. Add a secondary email address
You can add up to 10 secondary email addresses to your account. You can receive verification to any of these email addresses if you wish to.
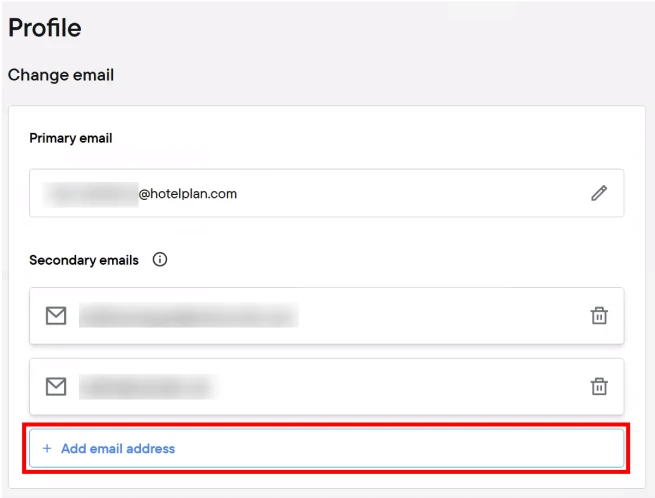
To add a secondary email address, you must log in first, then navigate to the Change email page
| Navigation steps (mobile): | Navigation steps (desktop): |
|---|---|
| tap Menu button in the bottom right corner | click the Account menu (on the top-right, has an icon, no text) |
| tap Account (you may have to scroll down to see it) | click My profile |
| tap My profile | you should already see the page 'Change email'. If not, click 'Email' on the left side menu. |
| tap Email |
Further steps (mobile and desktop):
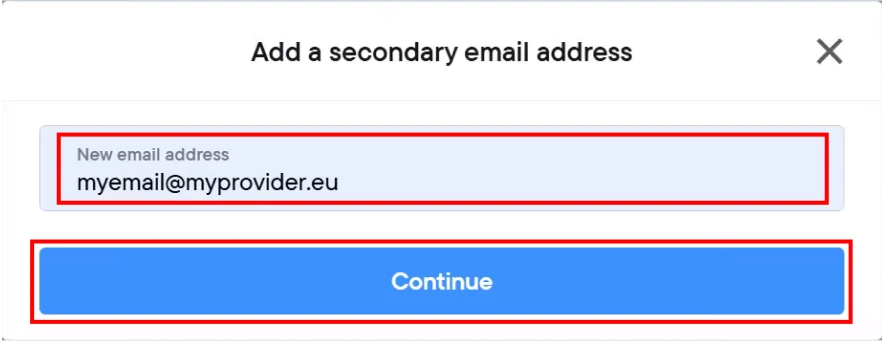
- tap Add email address
- in the dialog that appears, enter your new secondary email address. Please make sure there are no spelling mistakes.
- click Continue
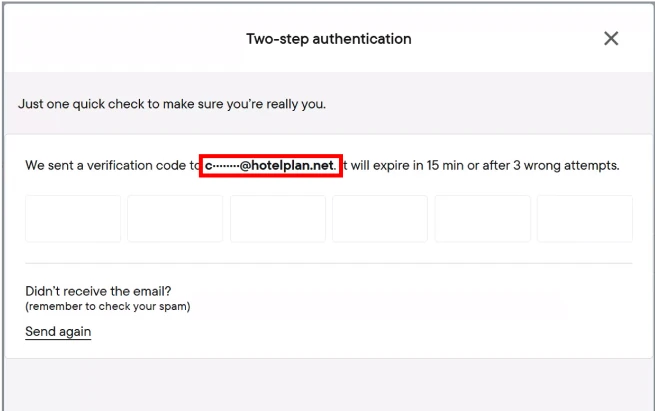
- when asked to enter a verification code, please open your primary email address (not the new secondary one) and copy the code from it for verification.
- If verification was successful, the email address is added to the list of secondary emails:

1.4.2. Log in with a secondary email address
Once you've added a secondary email address, you can request verification codes to it.
- Log in with your Owner number and password
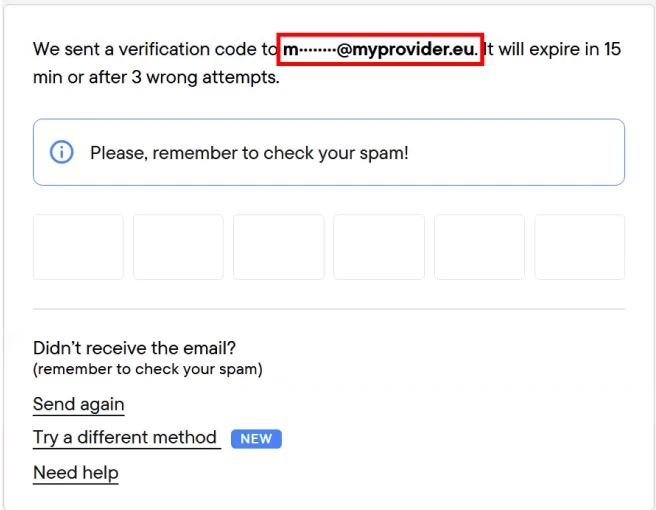
- In case the verification code wasn't sent to the desired email address (see the upper/yellow highlighting below), then click Try a different address or use SMS.
- From the dialog, select the desired secondary email address

- Open the email account and copy the verification code from it
(see chapter on verification codes for more details on using them)
1.5. Passkeys (passwordless login)
Passkeys allow quick login without passwords or verification codes. They are considered safer than passwords. They are available on most mobile devices and laptops.
1.5.1. Setting up passkeys
Passkeys use the device’s security features such as fingerprint, Face ID or PIN codes:
- Passkeys typically have to be set up separately for each device.
- Certain devices might not support passkeys.
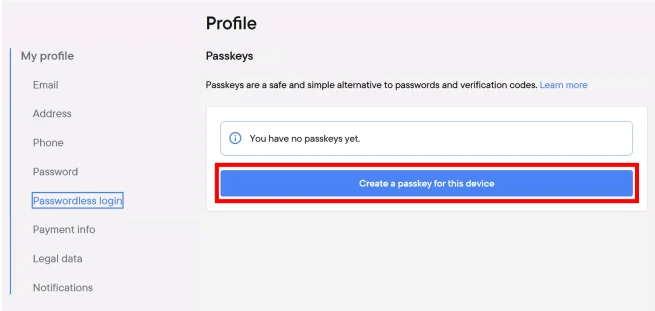
Passkeys can be set up after logging in to Interhome. After logging in, go to the Passwordless login page:
| Navigation steps (mobile): | Navigation steps (desktop): |
|---|---|
| tap Menu button in the bottom right corner | click Account menu (on the top-right, has an icon, no text) |
| tap Account | click the My profile |
| tap My profile | click Passwordless login in the left side menu |
| tap Passwordless login |
Within the page, click Create a passkey for this device and follow the instructions on screen:
Passkeys are a feature of your device
The process of creating passkeys is handled by your device, it can be different on different device types. If there's a problem during passkey creation, you might want to consult your device manufacturer's guide.
Storing and deleting passkeys, privacy
Note that passkeys are stored on your device. Interhome has no access to them, neither your biometric data.
It is possible to remove a passkey within the Owner Portal, which will only make it unusable. Your device will still list the passkey, which you can delete from it manually.
1.5.2. Logging in with a passkey
Once a passkey has been set up for the device, it can be used for logging in to Interhome.
- Go to the login screen at https://new.myhome.interhome.group/login
- At the bottom of the dialog, click I have a passkey
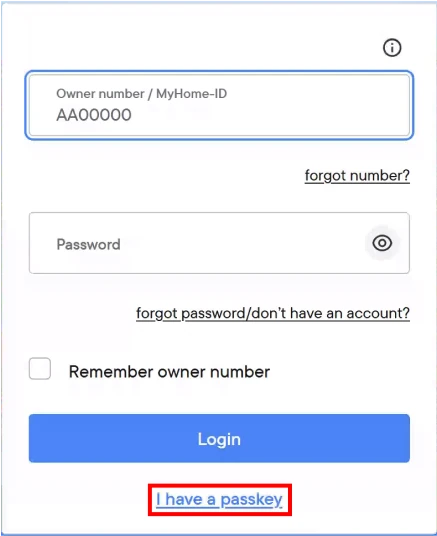
- Enter your Owner number and click Login with passkey
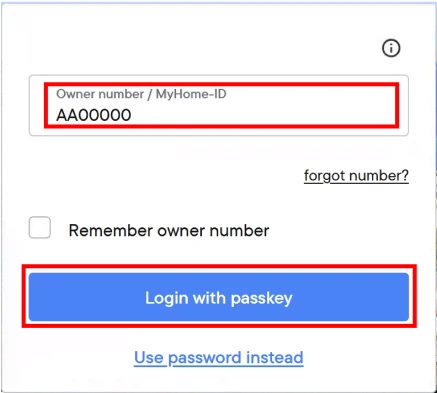
- If a valid passkey exists for this device, its operating system will prompt you to verify, for example using fingerprint or Face ID.
- If a valid passkey does not exist, please see the chapter on creating passkeys.
2. Activation of Push-Notifications/Messages on your mobile phone
Why should I do this?
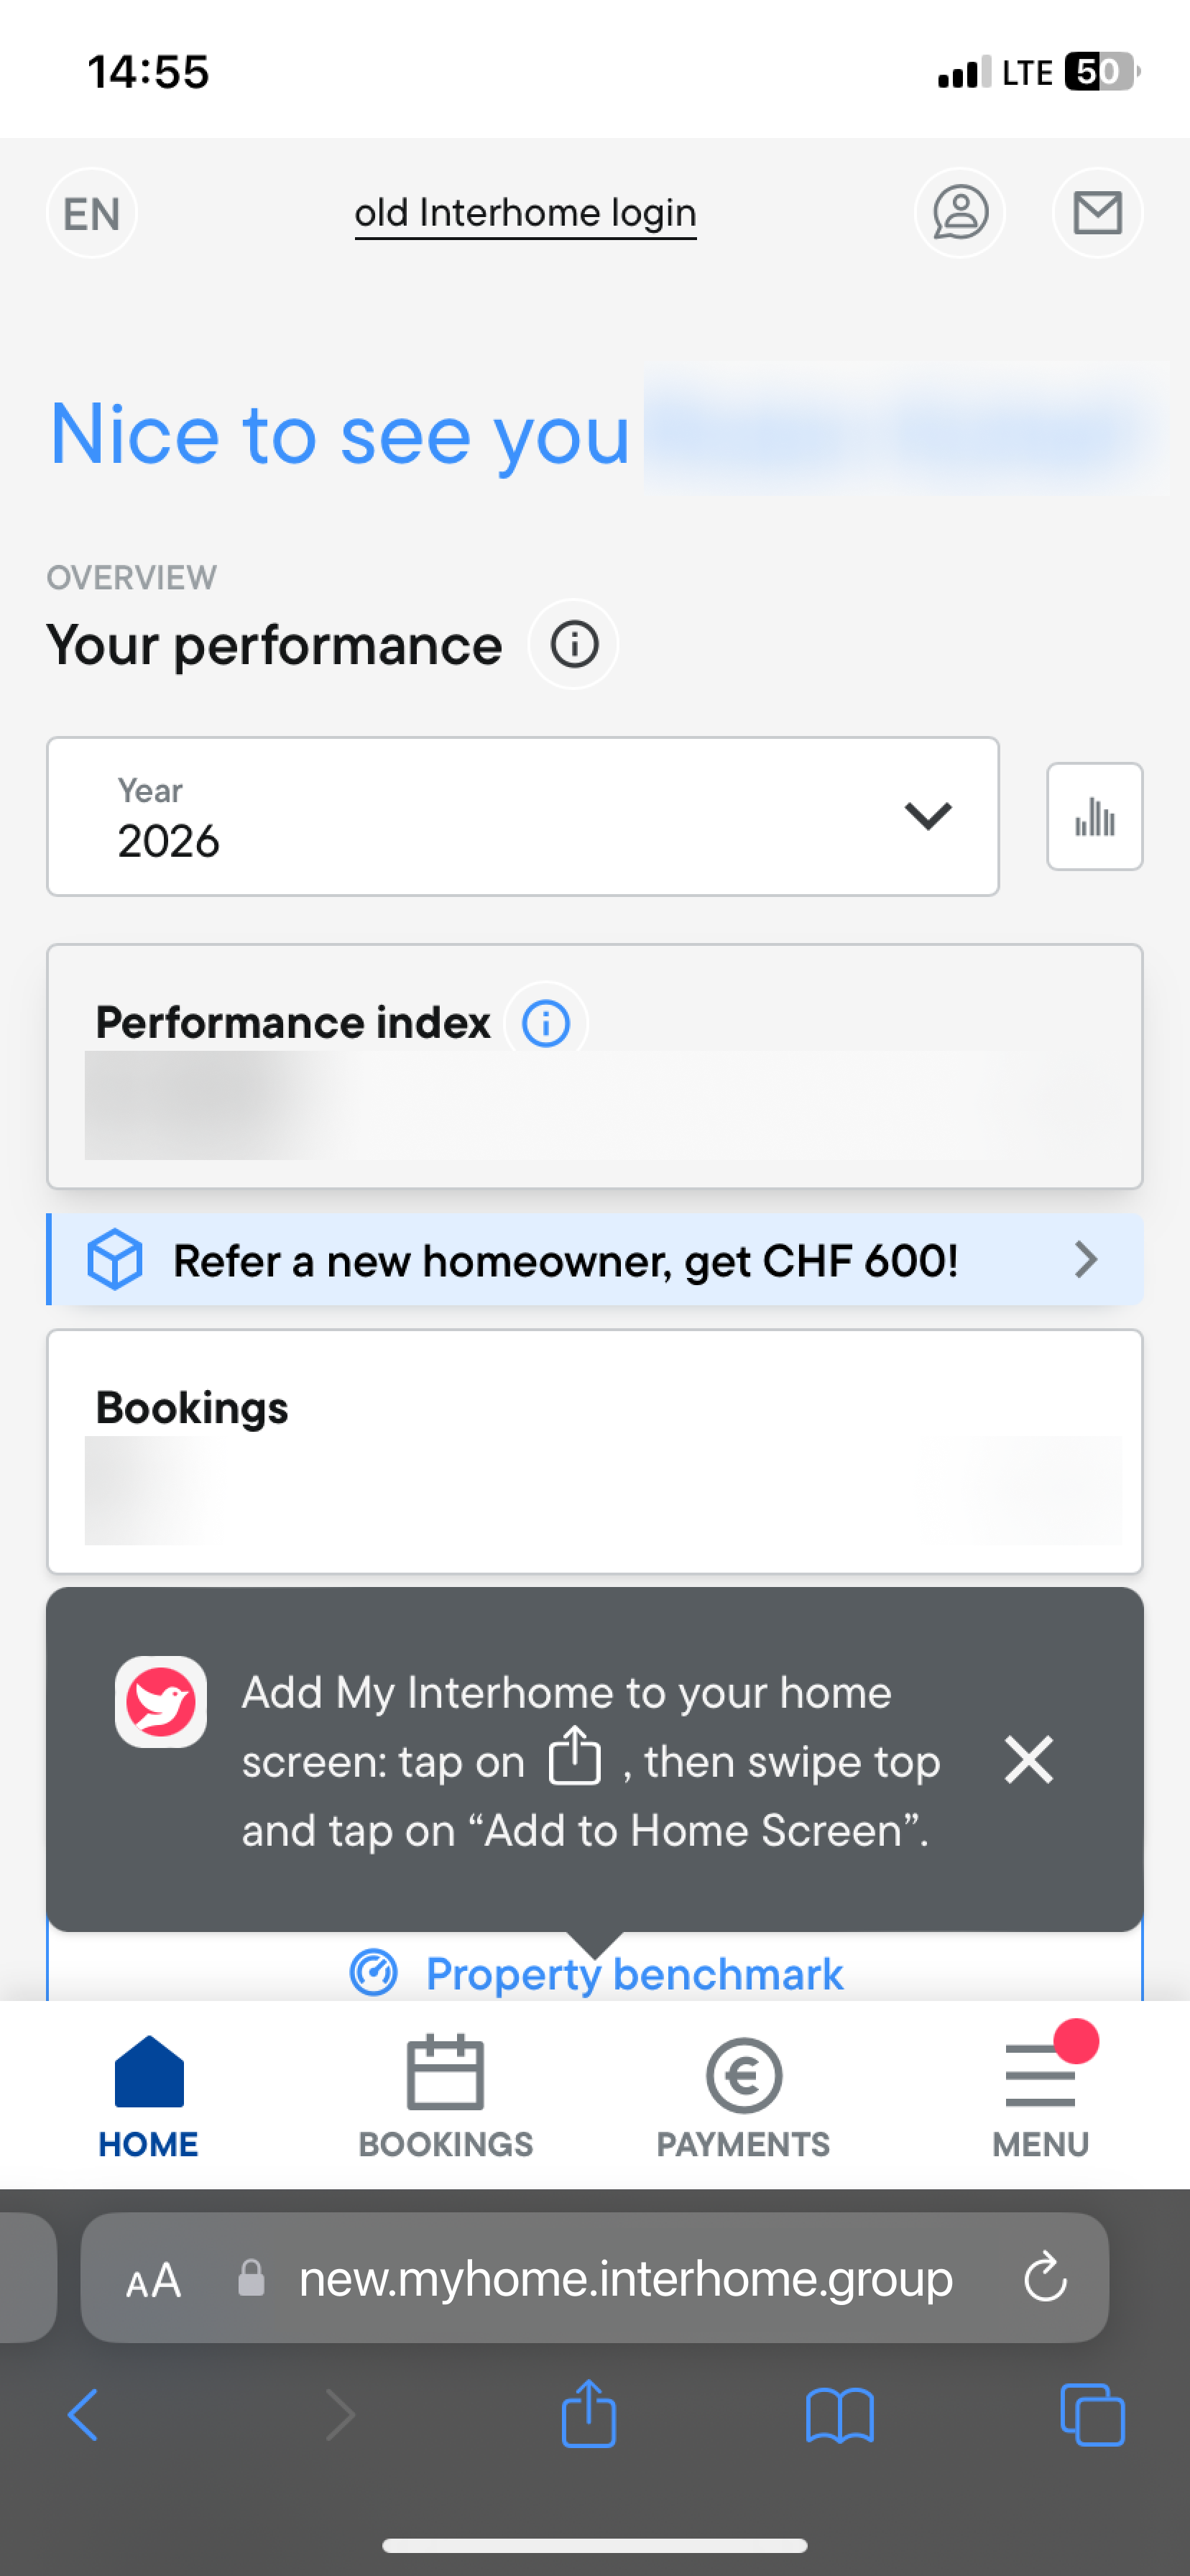
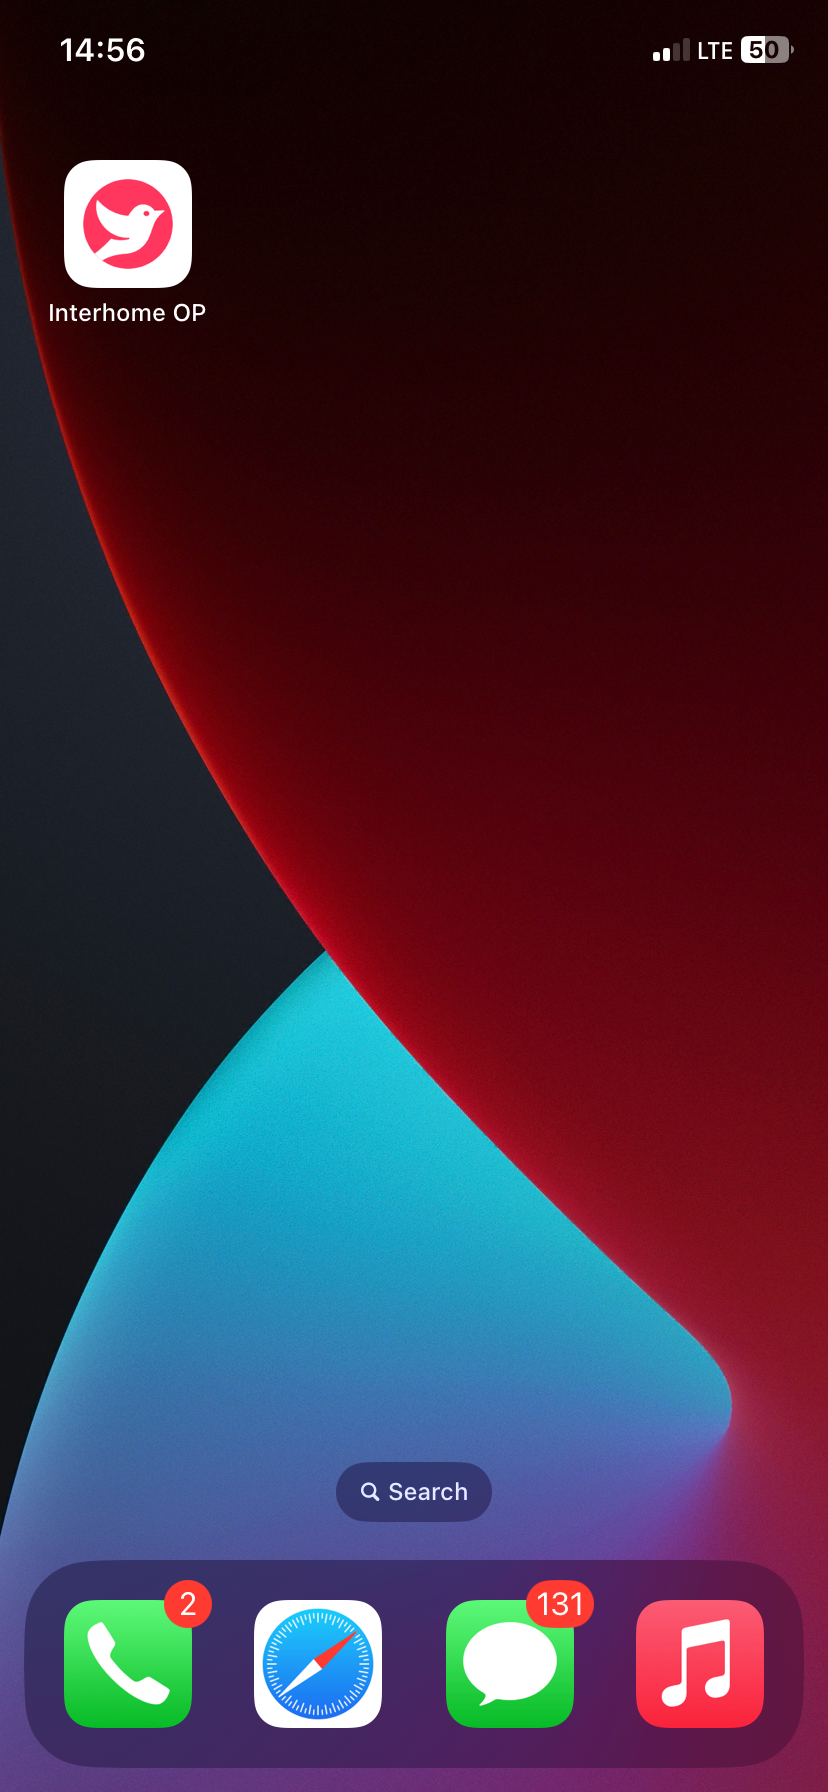
You can save the new Owner Portal to your home screen on your mobile phone. With that, you have our website icon on your home screen for quick access.
As a next step you can activate push notifications / messages and receive a push message on your mobile phone for every new inbox message (for example when you have a new booking).
2.1 Install the Owner Portal app (PWA)
Step 1 – Log in
- Log in to the new Owner Portal on your mobile phone in any browser.
- Go to https://new.myhome.interhome.group/login
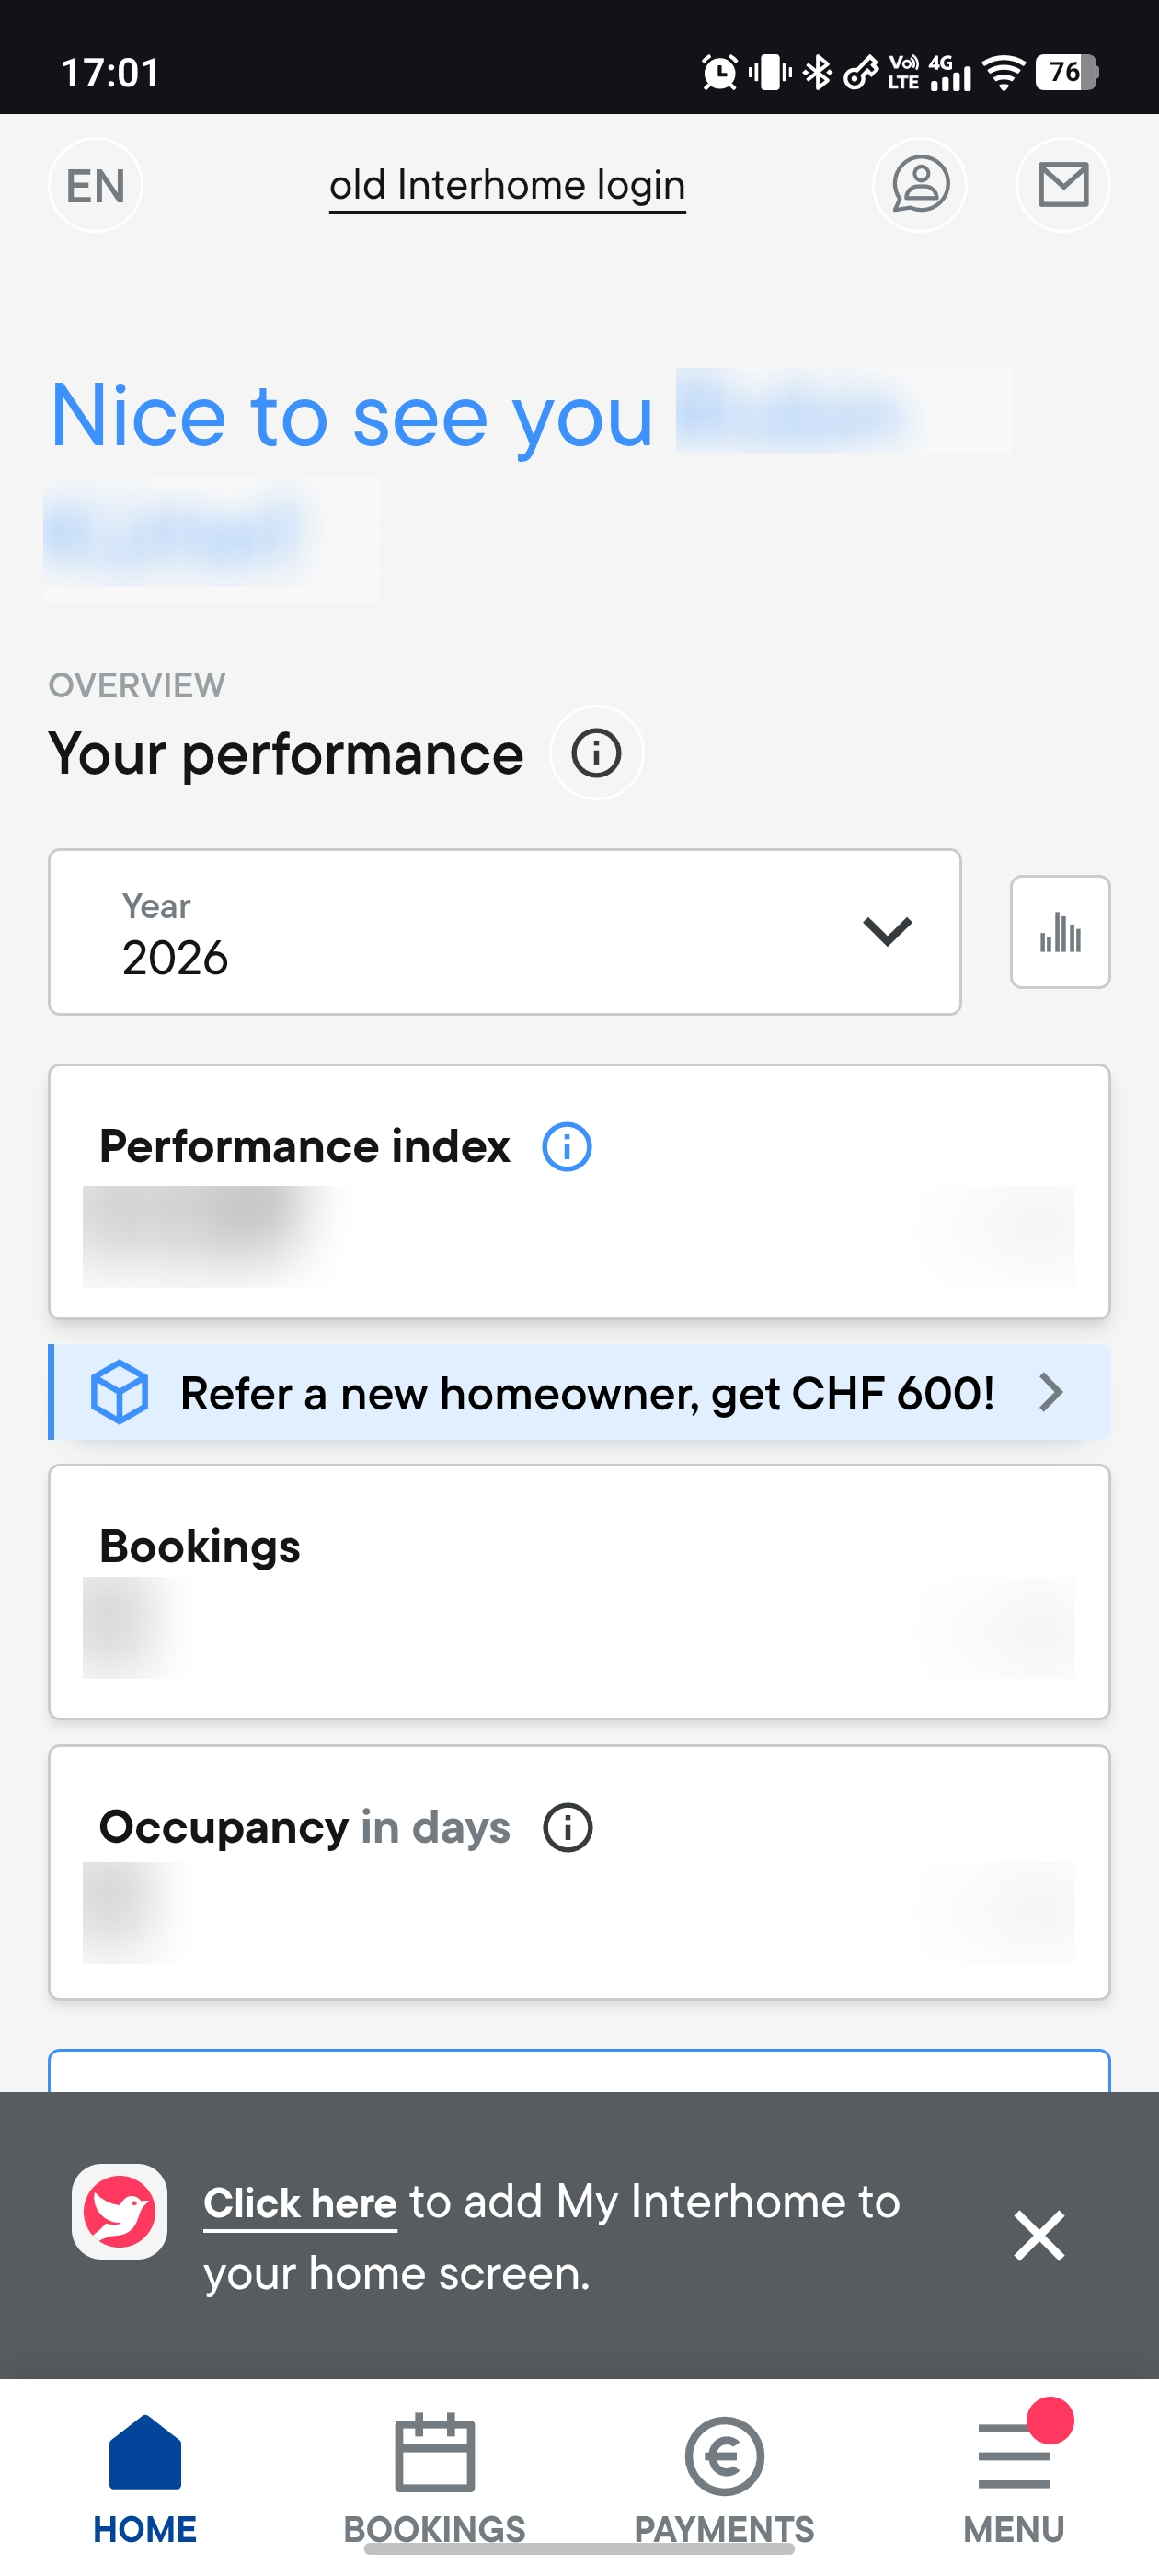
Step 2 – Grey pop-up appears (examples for iPhone and Android)
- After login, a grey pop-up should appear.
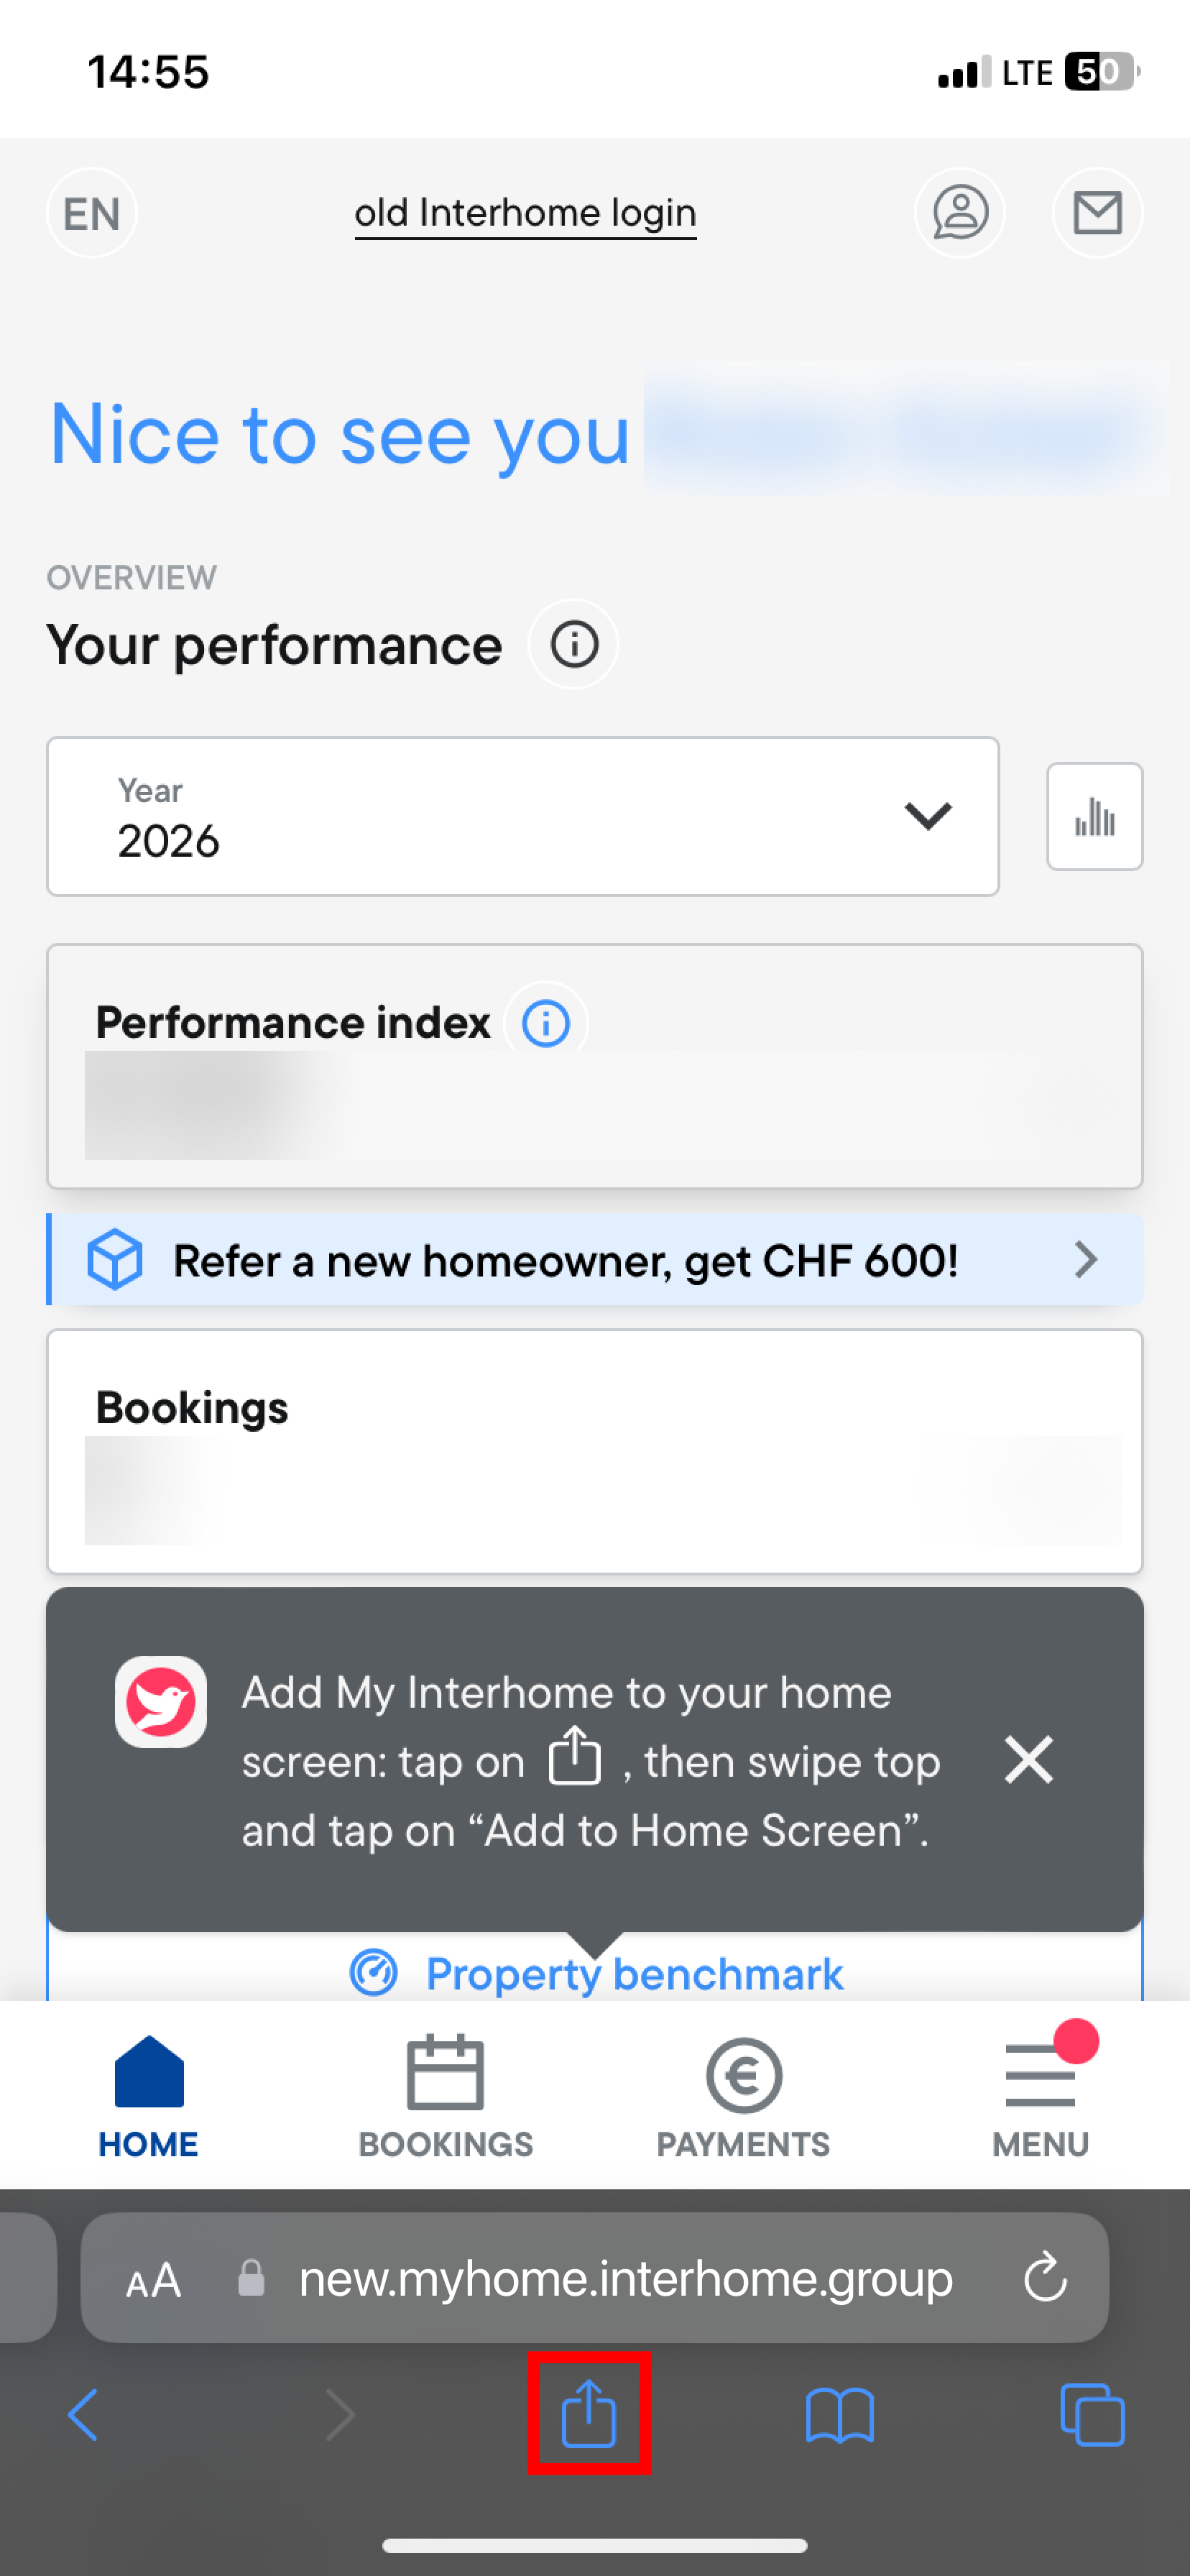
Step 3 / iPhone – Add the app to your Home Screen
- Tap the
 icon in your browser (Safari).
 - A window/menu opens, scroll down and go to the option Add to Home Screen.
- If you don't see that option, you can add it. Scroll down to the bottom of the list and tap Edit Actions..., then tap Add to Home Screen.
- More information: https://support.apple.com/guide/iphone/bookmark-favorite-webpages-iph42ab2f3a7/ios
Step 3 / Android – Install the app
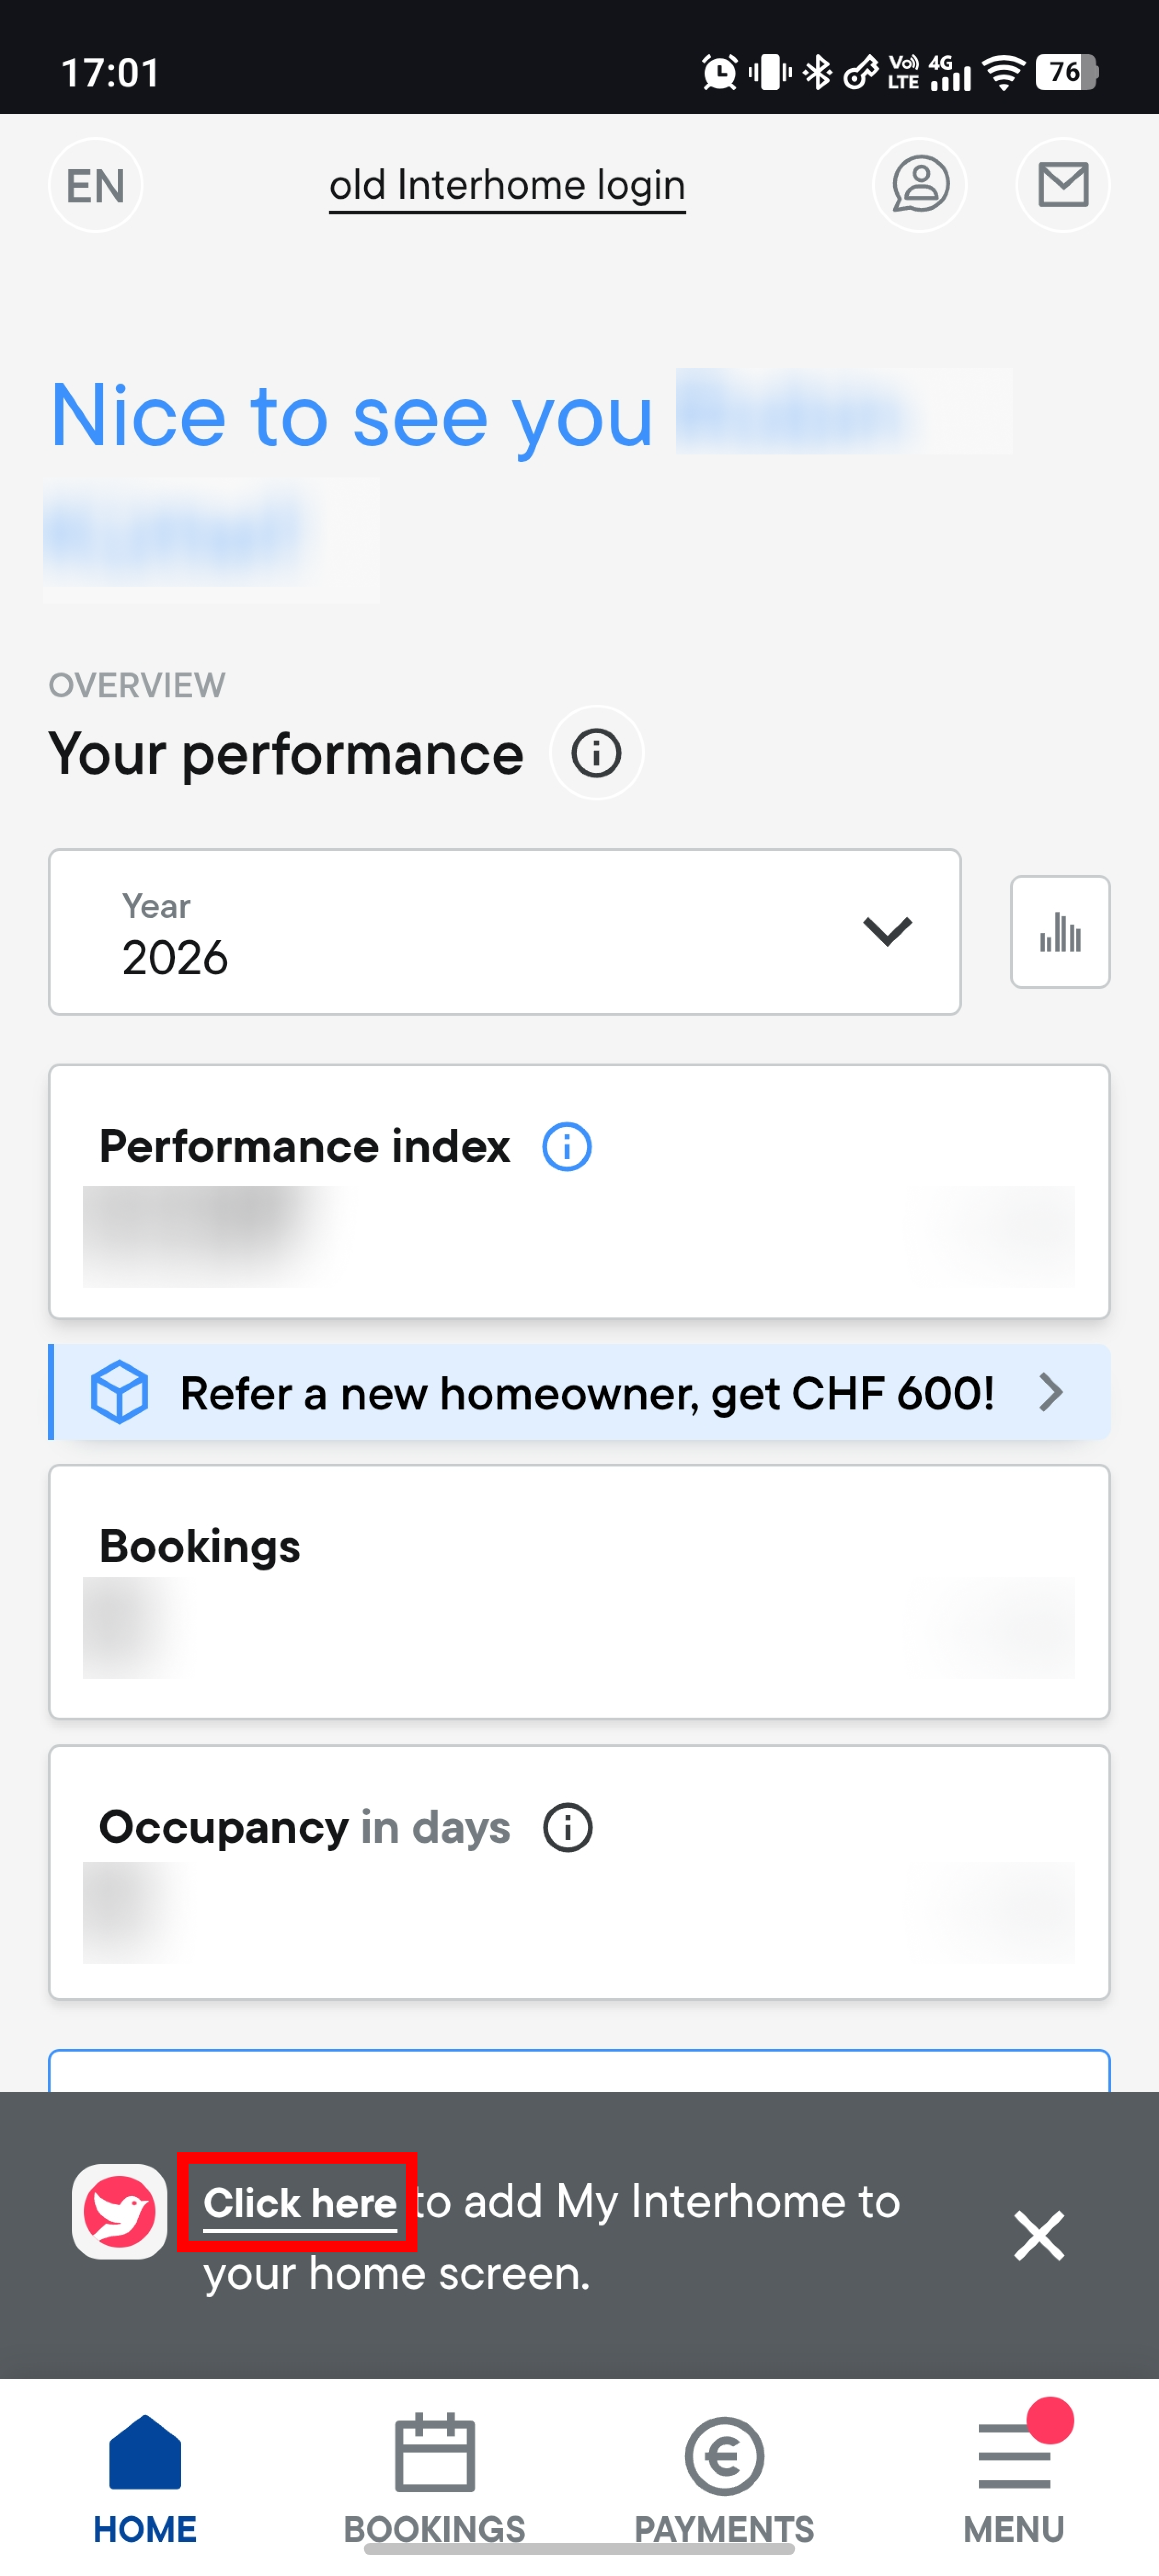
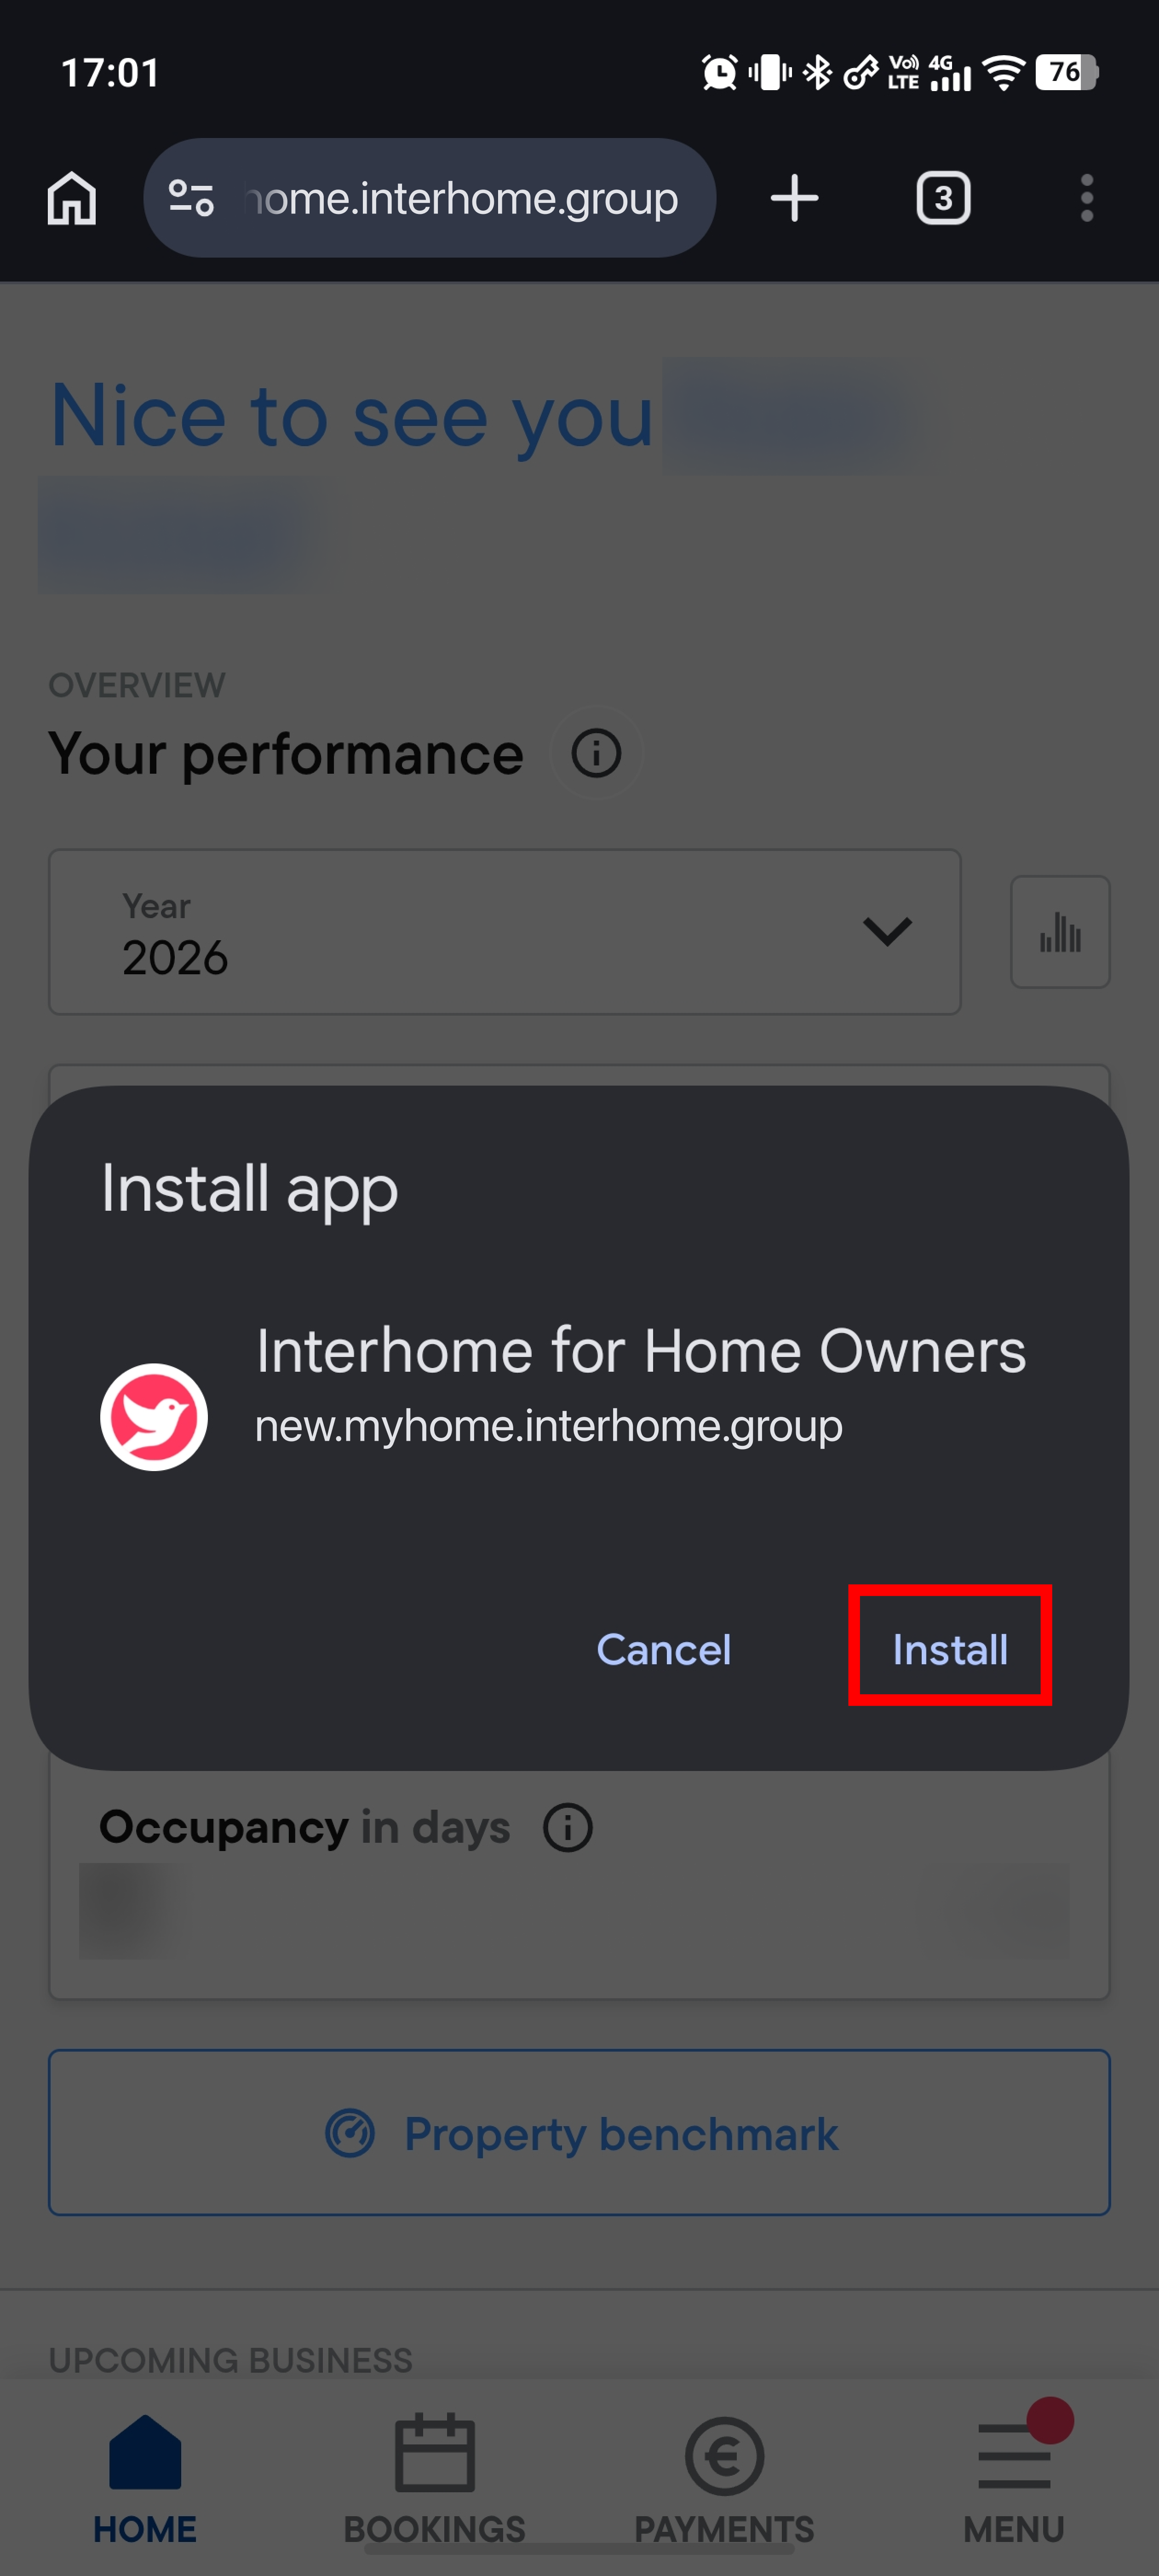
- Tap the link in the grey pop-up.
- Tap the Click here link; a pop-up opens (for example with the text Install app / Interhome for Home Owners).
- Tap Install.
2.2 Subscribe to push notifications
Step 1 – Open the app from your home screen and log in again
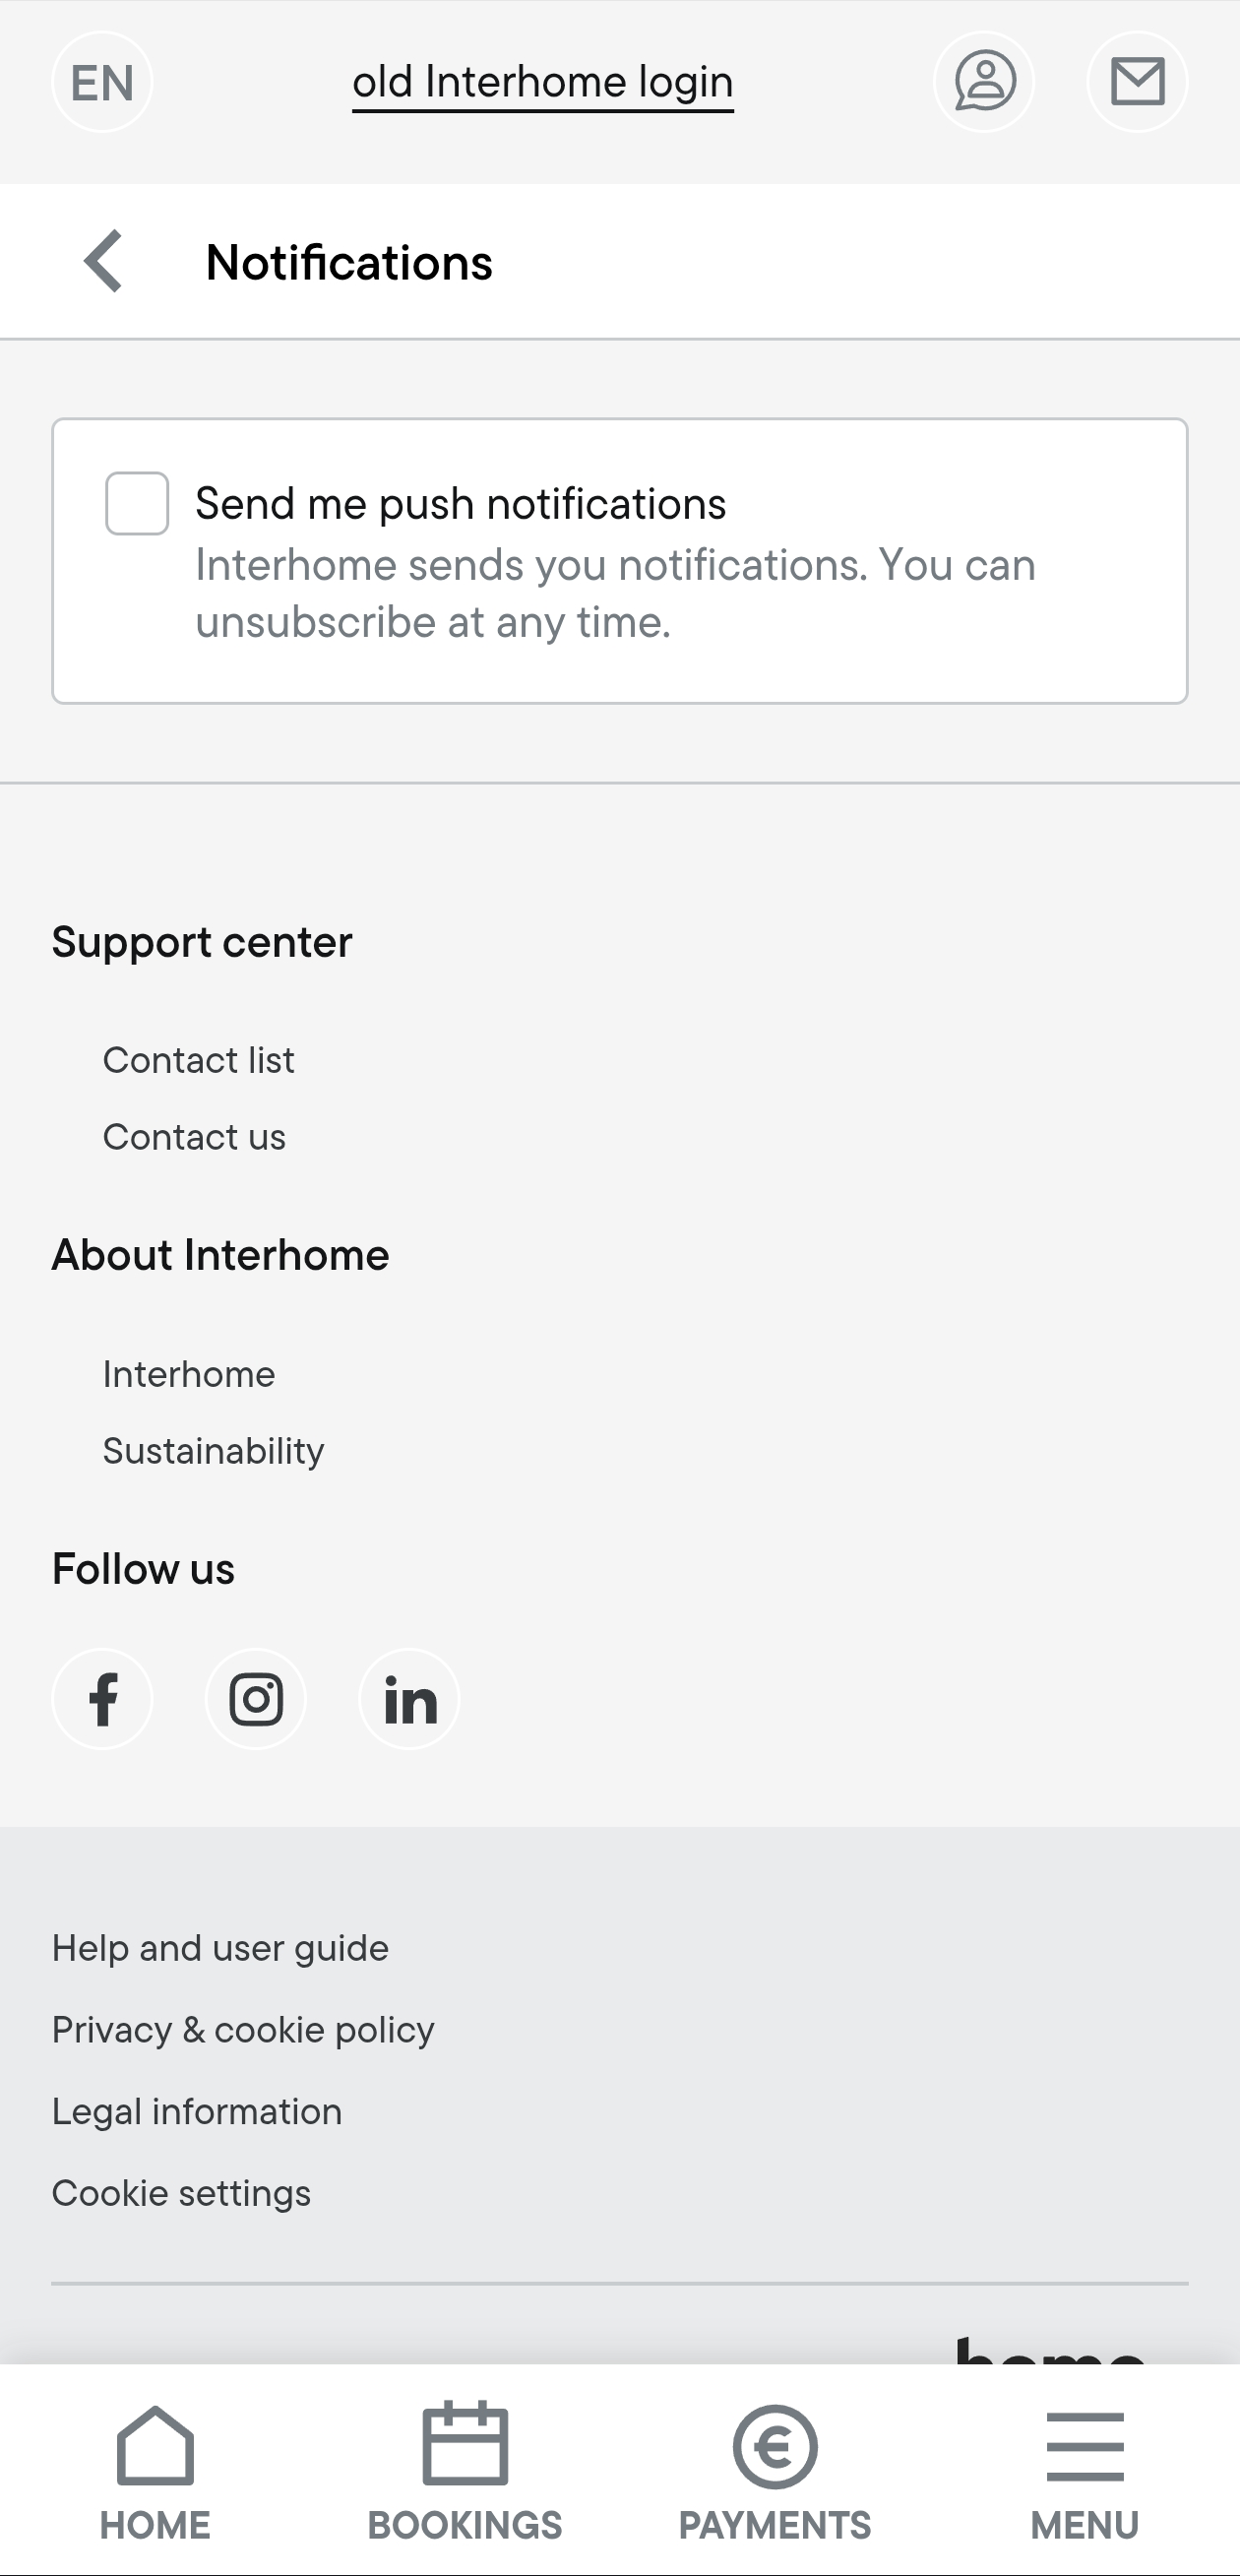
Step 2 – Check notifications in your profile
- Go to Your Profile / Your data and click on Notifications.
- The checkbox for push notifications should be ticked. If not, click the checkbox to activate push notifications.
Step 3 – If you have an iPhone, check your iOS version
- If you have iOS 17, push notifications will work with the steps before.
- If you have iOS 16, go to Settings → Safari → Advanced → Experimental Features and activate Push API.
- If you don't see Push API, we can assume it is enabled by default.